Friday, December 30, 2011
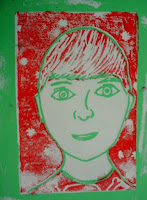
Reductive printmaking: self-portraits
Fifth graders worked on proportion when drawing their self-portraits - we spent some time figuring out sizes and placements of the parts of the face and printed a simple contour drawing from a styrofoam sheet. Next, we removed part of the printing plate by cutting and added textures and patterns in the remaining areas and printed with a second color of ink.
Subscribe to:
Post Comments (Atom)


They look gorgeous!
ReplyDeleteThese are really nice. We finished reduction printmaking in December, too. I really love yours, though.
ReplyDeleteThank you for the nomination Hope.
ReplyDeleteIt is nice to be recognized by your peers.
I'm really looking forward to trying this next year! These look fantastic.
ReplyDelete-Zach
thomaselementaryart.blogspot.com
Did the kids make sketches before drawing/carving on the Styrofoam? I am trying a variation on this lesson right now, and I had such a hard time getting the kids to buy into the self-portrait aspect of this lesson. Many of them seem intimidated by drawing self-portraits because they lack the confidence to try. Once we started printing, the kids seem to get more into it. Tips for getting them started on their portraits?
ReplyDeleteYes, definitely. I printed out a sheet with the facial proportion guidelines and then I gave them a blank paper that was the same size as the foam sheets to draw the portrait on first. I also demonstate how to use the guidelines. Once complete, they simply had to trace over the paper with the foam sheet underneath. I ask them to go back over it once more once the paper is removed, just to be certain the lines are deep enough. Hope that helps!
ReplyDelete