

Mrs. Knight's Smartest Artists, Dolvin Elementary School, Johns Creek, Georgia
Tuesday, May 29, 2012
Another suggestion: saving student work
Parents, I hope you have had a chance to look at your child's art portfolio from this year. During the last week of school, I posted a few ideas for saving favorite pieces, and I just came across this idea I had pinned from Pinterest that might just be the ultimate! (Original post here) If you have a scanner and printer, this collage is a space saving way to keep it all!
Saturday, May 26, 2012
Announcing the Digital Photography Club!
Look for more information this fall!
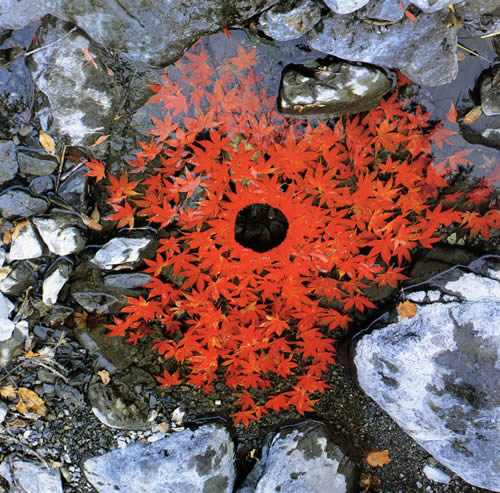 |
| Andy Goldsworthy |
 |
| Ansel Adams |
 |
| Sandy Skoglund |
Friday, May 25, 2012

Monday, May 21, 2012
Art Teacher Questions
Well, I published my "farewell for the summer" post before I realized I had forgotten to answer some questions that several art teachers e-mailed me about, so let's get those questions answered!
Question 1: What are those things on the wall above your student supply shelf?


 I gave up on using lidded watercolor boxes long ago, and found that ordering the Crayola refills (which come in plastic 3-hole containers) and a few plastic trays (I get mine from DickBlick.com) is a super easy and inexpensive way to give the students just the color schemes they need, along with plenty of mixing space in the plastic tray.
Question 3: Do you have a word wall?


Question 1: What are those things on the wall above your student supply shelf?


I made an "Art Materials Timeline" that shows the year different materials were invented, starting with caveman materials and ending with the invention of MacPaint in 1984. The print is easy to read if you are a student, standing at the supply shelf, but almost impossible to photograph as a timeline. I think timelines are interesting...
Question 2: What kind of watercolor paints are those, divided into warm and cool?

Question 3: Do you have a word wall?


I have started a collection of clear box framed vocabulary words that grows every year and has a permanent space on my wall. I love the clean look of these inexpensive, lightweight frames and they are very easy to change. Of course, all my elements and principles are always up on the walls, but these are a little more interesting tidbits.
Question 4: Did you make any changes to your portfolio after your first year with them?


I kept the overall design (see "portfolio" label on the right sidebar for more info) and I added a basic color wheel - older students can add intermediates - and a set of class rules, plus instructions on how to correctly label your work and an "about me" section with favorite things. Thanks to all the other portfolio users who blogged about their portfolios - it was fun adding your ideas!
There were a few other questions about storage, so here are a few of my storage methods:
 |
| empty boxes for various 3-D projects |
 |
| picture file and scrap paper - worth the investment!!! |
 |
| not so much organizing, more "waste management" |
 |
| I love saving these. Makes me feel accomplished, seeing pencils used up to the end! |
Sunday, May 20, 2012
Making a few changes

I will also be teaching my 15 year old daughter how to drive (yikes), and when I have a spare moment I want to experiment with a new look on my blog. So, fellow bloggers, I would love to read about some of your favorite blogging tricks and tips regarding design. I'd love to include some animations or other stylish things, so please comment with some of your favorite applications. No advice is too basic for me - although I am pretty confident about the content of my posts, I am not too experienced as a blog designer!
Thanks so much to all the readers this year, I really appreciate all the support. Thanks again to The Art of Education for upping my readership by leaps and bounds, and I look forward to another great year of "working" with all of you inspirational art teachers. Enjoy your summers to the fullest!
Thursday, May 17, 2012
More Fun with Yarn!
Fourth and fifth graders are spending our last art lesson finishing up our yarn weaving activities. As a part of their "Art of Mexico" unit, 4th graders made circle weavings representing Native American suns and moons, a common motif for the ancient Aztec and Mayan cultures. We used warm color schemes for the suns and cool for the moons, and either could use neutrals. Last year we finished these off with a mosaic background, seen here, but unfortunately we ran out of time this year, getting out of school a week earlier.


***Update: my weaving handout & prep sheet for the project below is now available on Teachers pay Teachers - see if it might come in handy for your cardboard loom weaving - https://www.teacherspayteachers.com/Store/Mrs-Knights-Smartest-Artists ***
Tapestry weaving has been on the minds of my 5th graders for the past 5 weeks, and we researched some tapestries from the Middle Ages to prepare. These can be used as bookmarks or wall hangings after removing them from the loom. We learned how to make a loom, how to add our warp strings, and how to weave 4 different patterns, as seen here:
 |
| we use a packet to keep our definitions and diagrams with our looms and weft strings |
 |
| this example shows tabby weave at the top, then dovetail, then a 2-color stripe |
 |
| this shows the checkerboard pattern in complementary red & green |
 |
| vertical stripes and other patterns can be created during "free weave" - once all 4 patterns have been demonstrated |
Tuesday, May 15, 2012
3rd grade sampler stitchery

 |
| antique sampler from rubylane.com |


Click here for the post on our beginning stages of this lesson.


Monday, May 14, 2012
Portfolios: Parent feedback appreciated!

I found a nice idea for storing work like this on the IHeart Organizing blog. I am doing this for my own 2 kids. It seems much easier than scrapbooking, which is what I've been doing up until this year - just drop important memories into a new file folder every year!
 Although you can't keep every paper that comes home, please go through the art portfolio with your child and talk about what they learned during the different lessons. Together, choose a few pieces to file, stick on the fridge or in a frame, or add to a scrapbook.
 Were you inspired by a particular artist for this piece?
What materials did you use?
Which is your favorite and why?
Does this have a special meaning to you?
Does this piece look like something from real life or from your imagination?
What would you change about this if you could?
What did you title this piece?
I would love to hear from parents - please let me know your favorite ways to keep your children's artworks by adding a comment. I would also love to hear which pieces were your favorites this year, so I can keep them in the repertoire! We really accomplished a lot this year and I am very proud of the work they are taking home - enjoy! (If only you could see my closet right now - we are bursting at the seams : )

Sunday, May 13, 2012
Finishing up our prehistoric unit
Kindergarteners are finished with the last 2 projects of our prehistoric art unit, clay fossils and cave paintings. This is a really fun unit - we do a lot of imagining!


 |
| This little girl was laughing at the "rain" sound made by all the kids crumbling their paper - so cute! |


Subscribe to:
Posts (Atom)